背景
最近在学习Linux的内核驱动,就想在Linux环境下搭建一个运行Linux的环境。了解到qemu可以满足我的需求,就折腾了一下。 参考1 参考2
环境
- VM虚拟机
- Ubuntu 20.04
安装
vm虚拟机和Ubuntu安装
vbox虚拟机和ubuntu安装
相关工具链
命令行终端下输入:
sudo apt-get update
sudo apt-get install -y git gnupg flex bison gperf build-essential \
zip curl zlib1g-dev gcc-multilib g++-multilib libc6-dev-i386 \
lib32ncurses5-dev x11proto-core-dev libx11-dev lib32z1-dev ccache \
libgl1-mesa-dev libxml2-utils xsltproc unzip u-boot-tools bc qemu qemu-system-arm
arm交叉编译工具
方法一(对版本没有要求)
使用apt直接安装
sudo apt-get install gcc-arm-linux-gnueabi -y
方法二(自己选择版本)
- 下载编译链,执行命令 arm交叉编译器下载地址
wget https://releases.linaro.org/components/toolchain/binaries/latest-7/arm-linux-gnueabi/gcc-linaro-7.5.0-2019.12-x86_64_arm-linux-gnueabi.tar.xz
关于编译链的资料参考: arm交叉编译器gnueabi、none-eabi、arm-eabi、gnueabihf的区别
- 解压源码
tar -xjf gcc-linaro-7.5.0-2019.12-x86_64_arm-linux-gnueabi.tar.xz
- 添加环境变量,使你的编译链全局可用
gedit /etc/profile
在最后一行加入:
export PATH=$PATH:/qemu-lab/gcc-linaro-7.5.0-2019.12-x86_64_arm-linux-gnueabi/bin
该路径是你编译链加压后的编译工具所在的路径
- 保存退出后使该变量生效
source /etc/profile
Linux内核
- 新建
linux-study-sample目录,后续所有操作都在这个目录下进行
mkdir linux-study-sample
cd linux-study-sample
- 下载 Linux内核下载地址
wget https://mirrors.tuna.tsinghua.edu.cn/kernel/v5.x/linux-5.10.99.tar.xz
- 解压
tar -xvf linux-5.10.99.tar.xz
- 编译
cd linux-5.10.99
vi build.sh
把下面的内容加入脚本
export ARCH=arm
export EXTRADIR=${PWD}/extra
export CROSS_COMPILE=arm-linux-gnueabi-
if [ -f ./extra ]; then
        echo "extra already exist!"
else
        mkdir extra
fi
make vexpress_defconfig
make zImage -j2
make modules -j2
make dtbs
cp arch/arm/boot/zImage extra/
cp arch/arm/boot/dts/*ca9.dtb   extra/
cp .config extra/
运行脚本,会编译Linux内核,并把生成文件拷贝到extra目录下
sh build.sh
根文件系统busybox
- 下载 解压
wget https://busybox.net/downloads/busybox-1.30.1.tar.bz2
tar xvf busybox-1.30.1.tar.bz2
- 配置
cd busybox-1.30.1
make CROSS_COMPILE=arm-linux-gnueabi- ARCH=arm menuconfig
编译时,可以选择静态编译,避免库的问题。
Settings ---> Build static binary(no shared libs)(NEW)
- 编译
make CROSS_COMPILE=arm-linux-gnueabi- ARCH=arm -j4
- 安装
make CROSS_COMPILE=arm-linux-gnueabi- ARCH=arm install
- 制作根文件系统
新建脚本
vi create_ext4_rootfs.sh
#!/bin/sh
busybox_folder="./busybox-1.30.1"
rootfs="rootfs"
img_name="disk.img"
echo $base_path
if [ ! -d $rootfs ]; then #判断文件是否存在
        mkdir $rootfs
fi
cp $busybox_folder/_install/*  $rootfs/ -rf
cd $rootfs
if [ ! -d proc ] && [ ! -d sys ] && [ ! -d dev ] && [ ! -d etc/init.d ]; then
        mkdir proc sys dev etc etc/init.d
fi

if [ -f etc/init.d/rcS ]; then
        rm etc/init.d/rcS
fi
echo "#!/bin/sh" > etc/init.d/rcS
echo "mount -t proc none /proc" >> etc/init.d/rcS
echo "mount -t sysfs none /sys" >> etc/init.d/rcS
echo "/sbin/mdev -s" >> etc/init.d/rcS
chmod +x etc/init.d/rcS


cd ../
#生成一个512M的镜像
if [ -f ./$img_name ]; then
        rm ./$img_name
fi
qemu-img create -f raw $img_name 512M

#把镜像格式化成ext4文件系统
mkfs -t ext4 ./$img_name

#将rootfs根目录中的所有文件复制到磁盘镜像中 操作步骤是:创建挂载点-挂载-复制文件-卸载。
if [ -f ./tmpfs ]; then
        rm ./tmpfs
fi
mkdir tmpfs
sudo mount -o loop ./$img_name tmpfs/
sudo cp -r $rootfs/* tmpfs/
sudo umount tmpfs

#使用file指令查看镜像
file $img_name
执行此脚本后,会在当前目录生成一个disk.img的文件系统镜像。
Q&A
- Q:stime error
/usr/bin/ld: libbb/lib.a(inet_common.o): in function `INET6_resolve':
inet_common.c:(.text.INET6_resolve+0x4a): 警告: Using 'getaddrinfo' in statically linked applications requires at runtime the shared libraries from the glibc version used for linking
/usr/bin/ld: coreutils/lib.a(mktemp.o): in function `mktemp_main':
mktemp.c:(.text.mktemp_main+0x98): 警告: the use of `mktemp' is dangerous, better use `mkstemp' or `mkdtemp'
/usr/bin/ld: networking/lib.a(ipcalc.o): in function `ipcalc_main':
ipcalc.c:(.text.ipcalc_main+0x231): 警告: Using 'gethostbyaddr' in statically linked applications requires at runtime the shared libraries from the glibc version used for linking
/usr/bin/ld: libbb/lib.a(inet_common.o): in function `INET_resolve':
inet_common.c:(.text.INET_resolve+0x4d): 警告: Using 'gethostbyname' in statically linked applications requires at runtime the shared libraries from the glibc version used for linking
/usr/bin/ld: networking/lib.a(inetd.o): in function `reread_config_file':
inetd.c:(.text.reread_config_file+0x254): 警告: Using 'getservbyname' in statically linked applications requires at runtime the shared libraries from the glibc version used for linking
/usr/bin/ld: networking/lib.a(netstat.o): in function `ip_port_str':
netstat.c:(.text.ip_port_str+0x50): 警告: Using 'getservbyport' in statically linked applications requires at runtime the shared libraries from the glibc version used for linking
/usr/bin/ld: util-linux/lib.a(rdate.o): in function `rdate_main':
rdate.c:(.text.rdate_main+0xff): undefined reference to `stime'
/usr/bin/ld: coreutils/lib.a(date.o): in function `date_main':
date.c:(.text.date_main+0x25b): undefined reference to `stime'
collect2: error: ld returned 1 exit status
Note: if build needs additional libraries, put them in CONFIG_EXTRA_LDLIBS.
Example: CONFIG_EXTRA_LDLIBS="pthread dl tirpc audit pam"
make: *** [Makefile:718:busybox_unstripped] 错误 1
- A: 1.30.1有个bug,合入一个patch就可以了. patch地址
qemu运行Linux内核
cp disk.img ./linux-5.10.99/extra/
cd ./linux-5.10.99/extra/
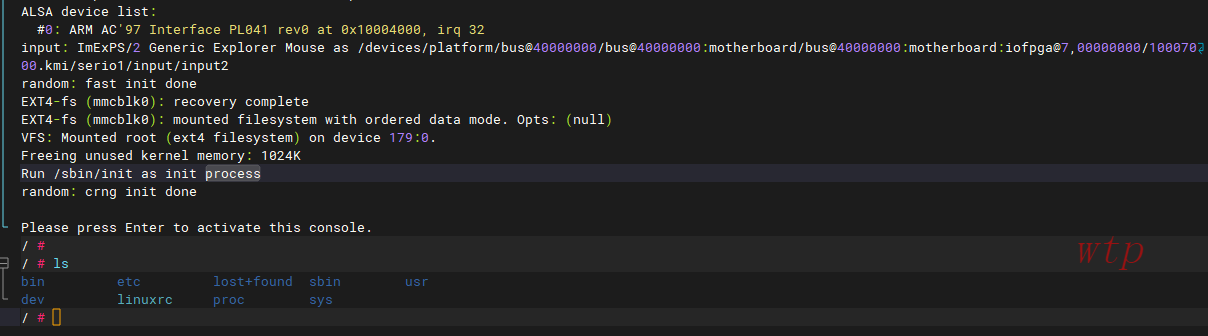
qemu-system-arm -M vexpress-a9 -m 512M -kernel zImage -dtb vexpress-v2p-ca9.dtb -nographic -append "root=/dev/mmcblk0 rw console=ttyAMA0" -sd disk.img
上面三步执行完之后,就会在当前终端使用qemu运行Linux。运行之后如下图:
退出qemu
快捷键Ctrl + a之后再按x即可退出